Version 02. Updates:
  • Invoke-WebRequest link
  • For secrets stored in source code
  • For secrets stored in configuration files
Storing sensitive data directly in source code (secrets hardcoding) is a security vulnerability. Through accidental source code exposure, or server-side file reading attacks, these secrets can be collected by attackers, who can then gain unauthorized access to related systems. Therefore, this insecure storage practice must be strictly avoided during software development. Below is how to detect and remove secrets from your project’s source code safely with Locker Secrets Manager.

Install Locker CLI

Start-Process powershell -Verb runAs
New-Item -Path "$HOME\.locker" -ItemType Directory -Force
Invoke-WebRequest -Uri "https://locker.io/secrets/download/cli-windows" -OutFile "$HOME\.locker\locker.exe"
$oldPath = [System.Environment]::GetEnvironmentVariable("Path", [System.EnvironmentVariableTarget]::Machine)
$newPath = "$oldPath;$HOME\.locker"
[System.Environment]::SetEnvironmentVariable("Path", $newPath, [System.EnvironmentVariableTarget]::Machine)

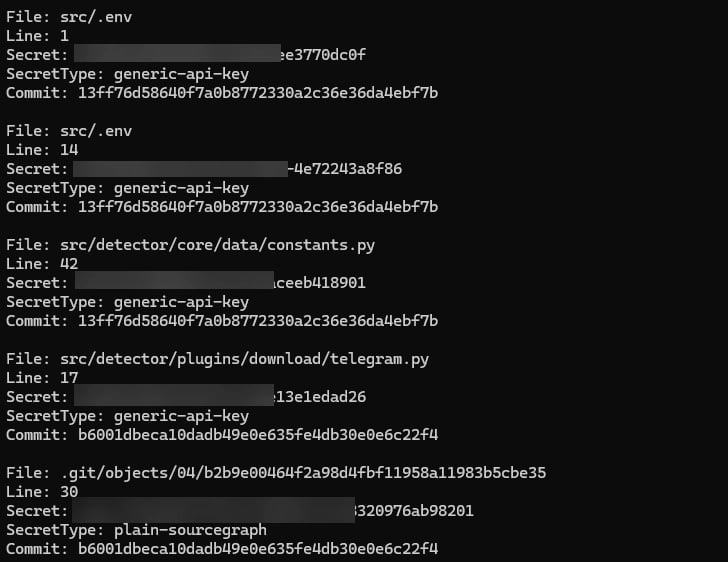
Detect Secrets in your project

Use the scan command as follows:
locker scan --source <path-to-source-code>
You will get results including: the file path containing secrets, the secret value found, the line number containing the secret, the secret type, and the commit hash. Locker scan command results

Change to a secure way of storing Secrets

With the findings from the scan, you will need to change how they are stored more securely instead of hardcoding. Initialize a project on Locker Secrets
  • Create a Locker Secrets account here if you don’t have one yet.
  • Create a new project, corresponding to the project that contains your secrets.
  • Create an Access Key in the Project. This is the key pair you will use for the Locker SDK in the following steps.

For secrets stored in source code

With a small number of secrets stored in source code, you can manually update them by following these steps:
  1. Add the corresponding hardcoded secrets to the Locker Secrets Project you just created through the web interface.
  2. Install the Secrets SDK corresponding to the language you are using here.
  3. Use the Access Key and Secret Access Key pair above to initialize in the SDK Config object.
  4. Manually find the location where your secret is hardcoded, then replace it by using the SDK to call the corresponding secret variable that was previously stored.
The automatic secrets update feature is being developed and will be available in upcoming versions.
Example with Python Suppose you have a settings.py file with hardcoded values as follows:
# ...
DEFAULT_CONFIG = {
  "database": {
    "host": "mysql.myserver.com",
    "port": 3306,
    "username": "my_database",
    "password": "Ol1PPgsG4htlBb0q7THJP7nWyBJXbAJg"
  },
  "request": {
    "access_key_id": "ak29NASAs",
    "secret_token": "qHg34VAGQZwCkUy4UjZQAsCVeH6TvsJg"
  }
}
# ...
Locker CLI has detected hardcoding at the following lines:
"password": "Ol1PPgsG4htlBb0q7THJP7nWyBJXbAJg"
...
"secret_token": "qHg34VAGQZwCkUy4UjZQAsCVeH6TvsJg"
You will need to create the corresponding secrets on the Locker Project through the web interface as follows:
DATABASE_PASSWORD: Ol1PPgsG4htlBb0q7THJP7nWyBJXbAJg
REQUEST_SECRET_TOKEN: qHg34VAGQZwCkUy4UjZQAsCVeH6TvsJg
Install the Locker Secret SDK and replace the hardcoding by using the SDK. requirements.txt
...
lockerpm
...
Store your Locker Access Key pair using environment variables:
export ACCESS_KEY_ID=<YOUR_ACCESS_KEY_ID>
export SECRET_ACCESS_KEY=<YOUR_SECRET_ACCESS_KEY>
Declare and initialize the Locker Secret Manager object: secret_management.py
import os
from locker import Locker

client = Locker(
    access_key_id=os.get_env(ACCESS_KEY_ID),
    secret_access_key=os.get_env(SECRET_ACCESS_KEY),
)
Replace the hardcoding by using the SDK to call variables: settings.py
from secret_management import client
# ...
DEFAULT_CONFIG = {
  "database": {
    "host": "mysql.myserver.com",
    "port": 3306,
    "username": "my_database",
    "password": client.get("DATABASE_PASSWORD"),
  },
  "request": {
    "access_key_id": "ak29NASAs",
    "secret_token": client.get("REQUEST_SECRET_TOKEN")
  }
}
# ...
With a large number of secrets, you can use the scan fix option. This option will upload all of your secrets to the corresponding Locker project, and automatically replace the secrets in the source code by using the SDK:
  1. Store the Locker Access Key pair using environment variables (same as above).
  2. Use the scan fix command:
locker scan fix --source <path-to-source-code> --language <program-language>
  1. Review your source code to ensure the secrets are called and used for their intended purpose.
Currently, the scan fix option is only supported for the Python language. Other languages will be added in the near future.
Example with the scan fix command: After using the locker scan fix --source . --language python command, the secrets will be automatically uploaded to the project with incrementally named keys like SECRET1, SECRET2 and a Locker SDK instance will be initialized: secret_manager.py
import os
from locker import Locker
locker_client = Locker(
    access_key_id=os.getenv("LOCKER_ACCESS_KEY_ID"),
    secret_access_key=os.getenv("LOCKER_SECRET_ACCESS_KEY")
)
settings.py
from secret_management import locker_client
# ...
DEFAULT_CONFIG = {
  "database": {
    "host": "mysql.myserver.com",
    "port": 3306,
    "username": "my_database",
    "password": locker_client.get("SECRET1"),
  },
  "request": {
    "access_key_id": "ak29NASAs",
    "secret_token": locker_client.get("SECRET2")
  }
}
# ...

For secrets stored in environment variable files

  1. Check whether the environment variable file is necessary for the project. If not, proceed to delete this environment variable file.
  2. If your project needs the secrets in this environment variable file, configure Locker with the Access Key pair you created using the command:
locker configuration --access-key-id {access key id} --secret-access-key {secret access key}
  1. Save the secret to the Locker Secret Vault:
locker secret create --key {secret key} --value {secret value} --description {secret description (optional)} --environment {secret environment}
  1. Use the locker secret run command to run your project with the stored secrets:
locker secret run --environment dev --command your_command
The locker run command will inject the secrets from a specified environment as environment variables into your program’s run command.
  1. Delete the secrets stored in your environment variable file.

For secrets stored in configuration files

  1. Configure Locker CLI with the Access Key and Secret Key pair you created earlier:
locker configuration --access-key-id {YOUR_ACCESS_KEY_ID} --secret-access-key {YOUR_SECRET_ACCESS_KEY}
  1. Based on the scan results, identify the configuration file containing your secrets, then use Locker CLI to import these secrets to the project:
locker secret import --source {CONFIG_FILE_LOCATION}
  1. If your program uses secrets stored in the configuration file, replace the part of the source code that uses this config file with the Locker SDK.